
1
Send to the shared area
When one item or a multi-selection is active, the shared-area button can copy the selected part from the workspace, group, true/false action branch, dialog, and variables surfaces into the device-local library.
Visual Builder guide
Choose a block from the selector below or, on desktop, from the left rail. Every block includes purpose, parameters, common scenarios, cautions, and an in-app screenshot.
Professional no-code workflow map
Cross-macro local library
The Local Shared Macro Area moves blocks, variables, dialog fields, gallery assets, and imported media dependencies between macros on the same device. It is device-local, not cloud sync, not Firebase sharing, and not a replacement for public macro sharing.
Professional usage model: put a reusable login flow, common scan region, shared dialog form, variable group, template image, color profile, replay recording, or imported PLAY_SOUND media file into the shared area from one macro, then import it from the relevant + menu in another macro.
VISUAL_BLOCKSVARIABLESDIALOG_FIELDSTEMPLATE_IMAGECOLOR_SWATCHREPLAY_RECORDMEDIA_FILEWhen one item or a multi-selection is active, the shared-area button can copy the selected part from the workspace, group, true/false action branch, dialog, and variables surfaces into the device-local library.
The shared-area entry under the + menu imports the selected item into the surface that opened it. Main workspace, group, action branch, dialog, and variables each receive the compatible item type.
Gallery items include template images, color swatches, replay records, and imported audio/media files. They can move between macros on the same device so repeated templates, colors, recordings, and PLAY_SOUND media assets do not need to be captured again.
The shared area is not a permanent dumping ground. Delete stale shared items from the shared-library panel; imports create a copy in the target macro and do not rewrite the source macro flow.
AI assistant
Tell MH AI what you want in plain language; it proposes the right block sequence and lands it in the workspace after you approve. In the current release it works with cloud providers such as Gemini, Claude, and OpenAI; on-device local models are on the roadmap.
Searches for a template image on screen
Block Preview
Captured from the in-app Visual Builder block card in the English UI.
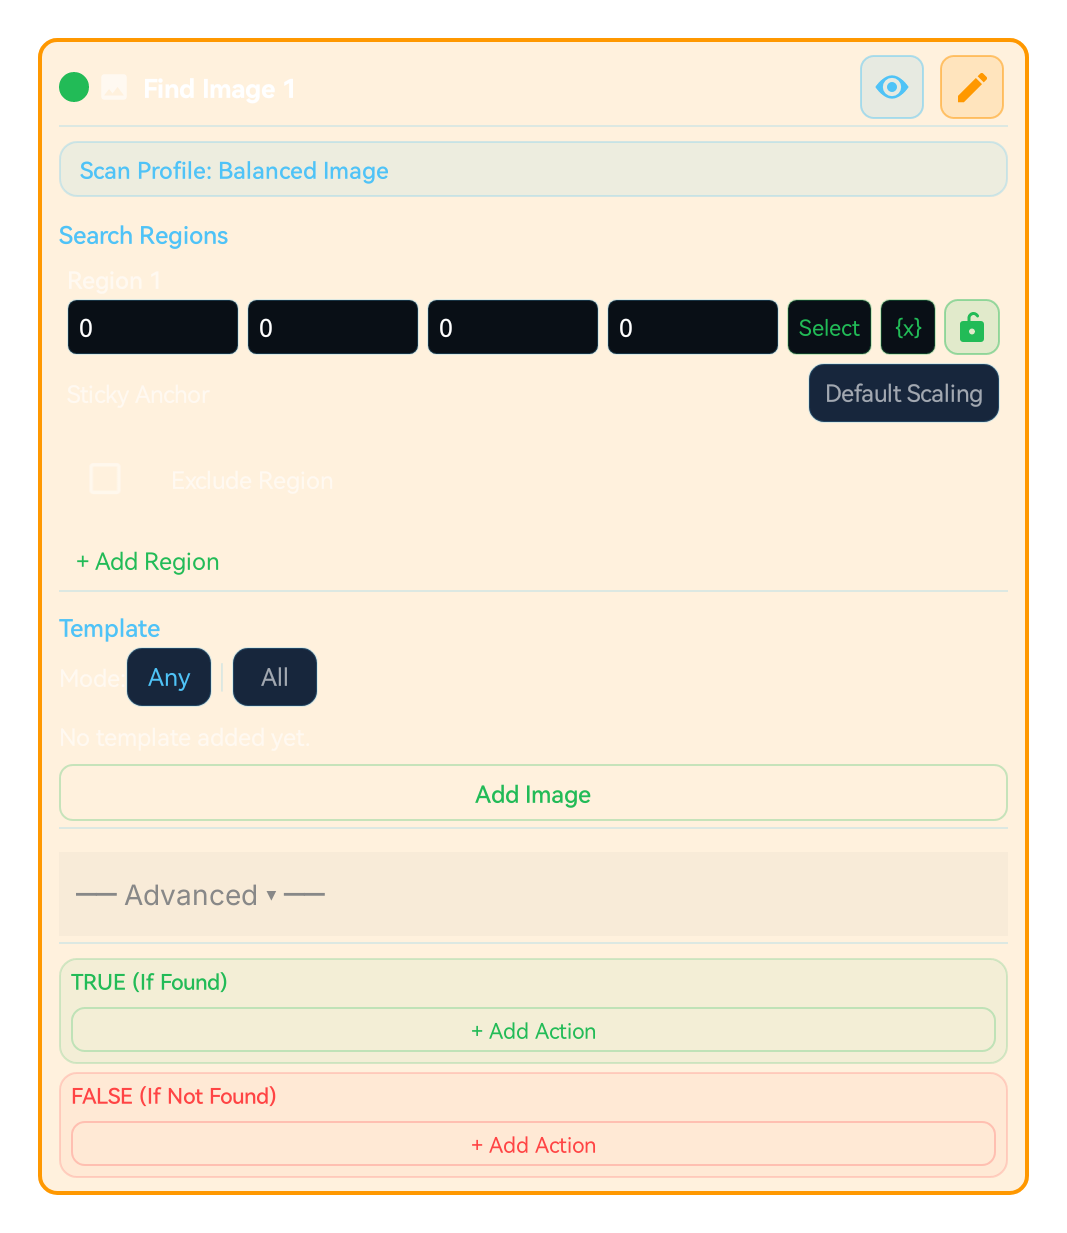
Block Preview
Captured from the English Visual Builder block card with the Advanced/extra settings panel expanded.
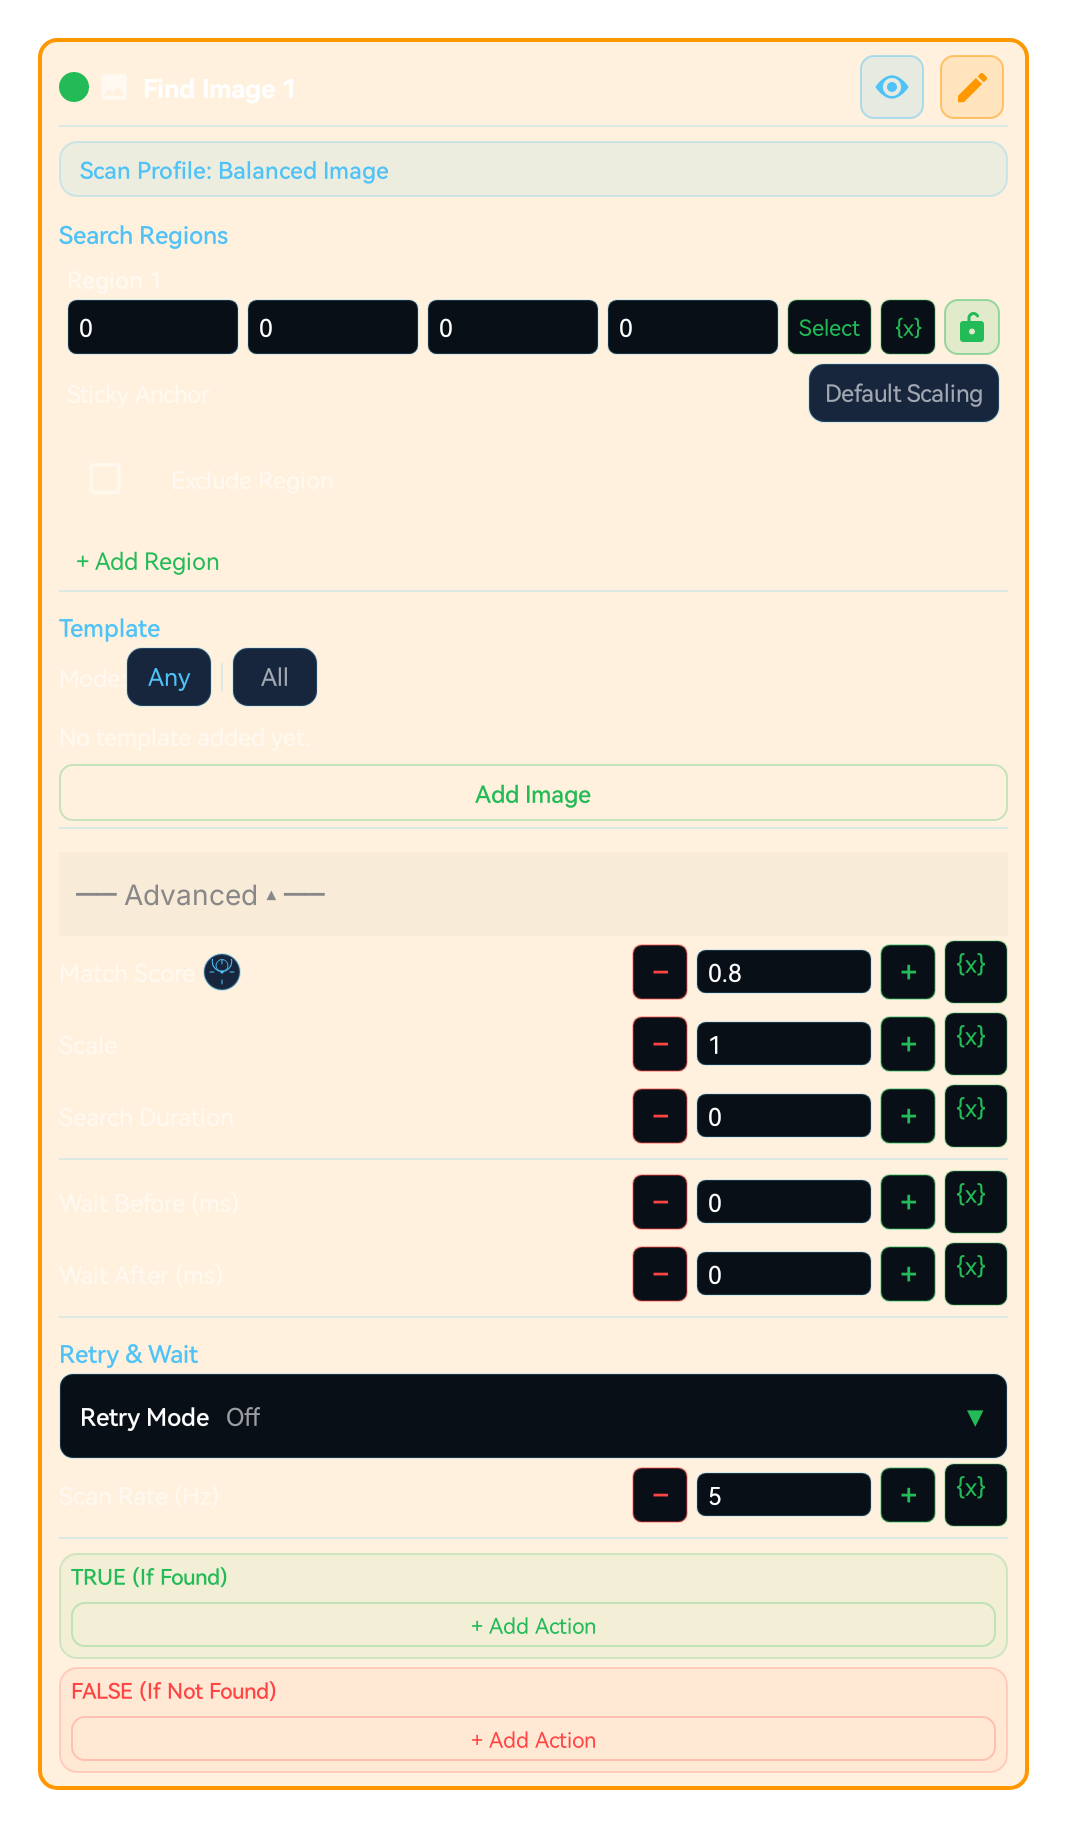
Searches for a specific template inside the selected scan region. Goes to TRUE if a match is found, FALSE otherwise. Scanning runs with a single selected engine; there is no automatic full-screen fallback.
IMAGE is not only about choosing one template. In the builder, multiple regions and per-region excludes are a core part of making the flow stable.
IMAGE, TEXT, COLOR, and OCR-related blocks can define multiple search regions. Each region can also carry its own exclude region to remove noisy areas and reduce false matches.
You can now assign a sticky anchor to each search region. This brings Region.sticky into the no-code surface so the region can stay aligned to anchors such as top_left, bottom_right, or center when screen geometry changes.
Search timeout defines one search window. Retry on true, retry on false, and waitUntilFound turn a block into a one-shot check or controlled polling step. scanRateHz controls attempts per second.
mScore, scale, and scan engine choices matter across themes, display sizes, and rendering differences. Smaller regions plus the right engine dramatically improve builder stability.
Use when you want to check if any screen element is visible:
Checking if a button appeared
Detecting if a notification or alert opened
Waiting for a loading screen to finish
Verifying navigation to a specific page
Checking if any icon or visual element exists
Add "Image (IMAGE)" block
Capture the template with "Select Template"
SCAN REGION: Always constrain the search area (smaller = faster)
SCAN ENGINE: quick_image / balanced_image / precision_image / color_aware_image / small_object_image
MATCH RATIO (mScore): lower = flexible, higher = stricter
SCALE: adjust for device differences
SEARCH TIMEOUT: 0 = single attempt
If retry is needed, set SCAN RATE (Hz): attempts per second
Configure TRUE/FALSE branches
ADVANCED — SCORE & POSITION: name a "Score Variable" (e.g. matchScore) and write the match location into matchX/matchY/matchW/matchH; then COMPARE on the score or CLICK {matchX} to act where it was found
ADVANCED — MULTI-MATCH: if the template appears in many spots, set the selection mode (First / Highest Score / Closest to Centre / Random)
Image to search for. Capture from screen or select from gallery
Screen area to search [x, y, width, height]. Smaller = faster
0.10-0.99 range. 0.80 default. Low = flexible, high = exact. Slider + manual + variable supported
1.0 = original. For different screen resolutions. Slider + manual + variable supported
quick_image / balanced_image / precision_image / color_aware_image / small_object_image
0 = single try, 5000 = try for 5sec. Slider 0-30000ms + variable supported
Attempts per second in retry mode. 1-30 Hz
Wait before searching. Slider 0-5000ms + variable supported
Wait after searching. Slider 0-5000ms + variable supported
Retry on true / Retry on false / Infinite / Wait until found
In Advanced, type a variable name (e.g. matchScore) and the 0.0–1.0 confidence (1.0 = perfect match) is written there the moment a match is found. Left empty, the score is computed but discarded. Right after, COMPARE "matchScore >= 0.90" to separate weak from strong matches — a second smarter gate over the risky grey zone just above the threshold.
Writes the match X/Y and box width/height into your own variables (e.g. matchX, matchY, matchW, matchH). Once stored, feed them into later blocks via {x}: CLICK {matchX},{matchY} to act where it was found, or MATH_EVAL to target a neighbour (delX = matchX + matchW + 60). Because the position lives in a variable it survives across other steps, loops, and waits.
When the template is found in many spots at once (20 chests, 10 "Claim" buttons), chooses which one is handed to the next action: First (in scan order), Highest Score (clearest), Closest to Centre (near the region middle), or Random (different each run). Put a "Click on Match" CLICK on TRUE and wrap IMAGE+CLICK in a GROUP loop to process the whole field.
| Parameter | Description |
|---|---|
| Template | Image to search for. Capture from screen or select from gallery |
| Scan Region | Screen area to search [x, y, width, height]. Smaller = faster |
| Match Ratio (mScore) | 0.10-0.99 range. 0.80 default. Low = flexible, high = exact. Slider + manual + variable supported |
| Scale | 1.0 = original. For different screen resolutions. Slider + manual + variable supported |
| Scan Engine | quick_image / balanced_image / precision_image / color_aware_image / small_object_image |
| Search Timeout | 0 = single try, 5000 = try for 5sec. Slider 0-30000ms + variable supported |
| Scan Rate (Hz) | Attempts per second in retry mode. 1-30 Hz |
| Wait Before (ms) | Wait before searching. Slider 0-5000ms + variable supported |
| Wait After (ms) | Wait after searching. Slider 0-5000ms + variable supported |
| Retry Modes | Retry on true / Retry on false / Infinite / Wait until found |
| Score Variable (Advanced) | In Advanced, type a variable name (e.g. matchScore) and the 0.0–1.0 confidence (1.0 = perfect match) is written there the moment a match is found. Left empty, the score is computed but discarded. Right after, COMPARE "matchScore >= 0.90" to separate weak from strong matches — a second smarter gate over the risky grey zone just above the threshold. |
| Match Position (matchX/Y/W/H) (Advanced) | Writes the match X/Y and box width/height into your own variables (e.g. matchX, matchY, matchW, matchH). Once stored, feed them into later blocks via {x}: CLICK {matchX},{matchY} to act where it was found, or MATH_EVAL to target a neighbour (delX = matchX + matchW + 60). Because the position lives in a variable it survives across other steps, loops, and waits. |
| Multi-Match Selection (Advanced) | When the template is found in many spots at once (20 chests, 10 "Claim" buttons), chooses which one is handed to the next action: First (in scan order), Highest Score (clearest), Closest to Centre (near the region middle), or Random (different each run). Put a "Click on Match" CLICK on TRUE and wrap IMAGE+CLICK in a GROUP loop to process the whole field. |
Scenario 1: Auto-click "OK" button when it appears
Add IMAGE → save "OK" button as template
Scan region: Area where button can appear
Add CLICK to TRUE → enable "Click on match"
Retry: "Retry on false" (waits until button appears)
Scenario 2: Wait for loading screen to finish
IMAGE → save loading icon as template
Retry: "Retry on true" (waits until icon disappears)
In FALSE: Loading done, proceed to next step
Scenario 3 (multi-target test screen): A test page has 15 identical checkboxes
IMAGE → save the checkbox template and constrain the scan region to the test area
Advanced → Multi-Match Selection: Highest Score (clearest box each pass)
Add a "Click on match" CLICK on the TRUE branch
Wrap IMAGE+CLICK in a bounded GROUP loop → each pass verifies the next valid match in the test flow
MOST COMMON COMBINATIONS:
IMAGE + CLICK: Find something and click it
IMAGE + WAIT: Wait for something to appear/disappear
IMAGE + SWIPE: Swipe when something is found
IMAGE + IMAGE: Multiple visual checks in sequence
IMAGE + COMPARE: Make decisions based on found position
IMAGE + COMPARE (branch on score): Compare the score variable to a threshold (matchScore >= 0.92)
IMAGE + CLICK {matchX}: Store the match position in a variable then click there
IMAGE + GROUP (multi-match): Selection mode + loop to process every copy
IMAGE + LOG: Log search results (for debugging)
Searches for a template image on screen
WARNING:
Starting macro without selecting template means block always goes to FALSE
Do not leave scan region as full screen — slow and may cause false matches
Do not capture templates from areas with changing backgrounds
Do not lower match ratio below 0.50
Adjust Scale when using on devices with different resolution
When you add this block in the no-code workspace, the Code Editor generates exactly the Lua below. Study it to see what the block does under the hood, to learn Lua, or to copy and adapt it. Use the Copy button (top-right) to paste it into the Code Editor, or “Try in Editor →” to run it in the live editor.
local match_score = nil

local _startMs1 = System.currentTime()
local _timedOut1 = false
local _loop1 = true
while _loop1 do
  if System.currentTime() - _startMs1 > 3000 then
    _timedOut1 = true
    _loop1 = false
    break
  end
  Snap.screenRefresh()
  local _reg3 = Region(0, 0, 540, 960)
  local m2 = _reg3:find(Asset.image("btn_play"):mScore(0.8):scale(1.5), {engine="balanced_image"})
  _lastMatch = m2
  if _lastMatch ~= nil then
    _loop1 = false
    match_score = (_lastMatch ~= nil and _lastMatch.getScore ~= nil and _lastMatch:getScore()) or 0
  else
    wait(1)
  end
end
if _timedOut1 then
  System.log("Search retry timeout exceeded: IMAGE")
end
Note: generated code can evolve across versions; helper names (e.g. _reg1, m1) and internal optimizations may change. The logic and the called APIs reflect the block’s behavior.
The guidance below is not identical for every block. It summarizes the professional controls that most often repeat in the selected block family.
Keep the search close to the target. Smaller regions are faster and more stable.
Exclude static noise, badges, animations, or reflective areas to reduce false matches.
Timeout and scan rate define whether the block acts as a single check or controlled polling step.
mScore, scale, and engine choice must be tuned together for theme, resolution, and rendering differences.
Passing _lastMatch, _lastOcrText, plus the Advanced score variable (0.0–1.0 confidence) and match position (matchX/matchY/matchW/matchH) into later blocks keeps the flow readable and smarter; COMPARE on the score, or CLICK {matchX} to act where it was found.
TOUCH and TOUCH_BREAK cover recipe-style touch flows. Raw pointer choreography such as Touch.down, Touch.move, Touch.up, Touch.dispatch, Touch.reset, Touch.breakAll, and Touch.releaseAfter is not exposed as a first-class builder block.
Touch.downTouch.moveTouch.upTouch.dispatchTouch.resetTouch.breakAllTouch.releaseAfterThe DIALOG block and dialog designer cover a bounded field set in the builder: info text, text input, checkbox, radio group, dropdown, image picker, tab group, and recorder picker. Freer Setting.builder composition, multi-step wizard flows, and mixed HUD/dialog choreography still do not map 1:1 into the builder.
Setting.builderDialogHudTextViewHTTP_GET, HTTP_POST, and HTTP_PUT cover common fixed-method flows; HTTP_REQUEST covers one bounded request with method, header lines, body, content type, and timeout. Freer query/retry composition, chained request objects, and lower-level client flows still need the code editor.
Request.setParameterRequest.setHeaderRequest.setBodyRequest.setContentTypeRequest.setRetryRequest()TRY_CATCHCUSTOM_CODEGeneral-purpose helpers such as Map, Array, JSON, Regex, and Metrics are broader than the builder recipe model. These surfaces remain on the coded runtime side instead of becoming first-class builder blocks.
MapArrayJSONRegexMetricsRuntime helpers, raw Request objects, Lua built-ins such as print/pcall/xpcall, and free-form object chaining patterns are represented through CUSTOM_CODE or the code editor.
RuntimeRequestprintpcallxpcallCUSTOM_CODEEach block card now exposes an independent breakpoint toggle. When enabled, the breakpoint preference is stored with the block.
Breakpoints are only emitted into runtime code when Debug Mode is enabled from Visual Builder settings. When Debug Mode is off, breakpoints stay saved but do not pause execution.
Use ASSERT for fail-fast validation, and use breakpoints for step-by-step tracing and controlled pauses in the same flow.
Variables defined with SET_VARIABLE are accessible throughout the macro (global scope). All blocks can read/write the same variable.
However, a variable defined inside a GROUP will be 'nil' (undefined) until the GROUP executes. Blocks outside the GROUP using this variable may produce unexpected results.
FOR_EACH loop variables (item and index) only carry valid values inside the loop body. Outside the loop they are outside local scope and should not be used.
TRY_CATCH error variable is only valid within the catch block. If the try block succeeds, the catch branch is not entered and the error variable remains undefined.
TIP: Before using a variable inside a GROUP, assign a default value with SET_VARIABLE outside the GROUP. This way the variable won't be nil even if the GROUP has not run.
You can embed variable values and calculations into text fields using {{ expression }} syntax. Expressions inside double curly braces are evaluated as Lua code and the result is inserted into the text.
{{ expression }}Skor: {{ score + 1 }} → "Skor: " .. tostring(score + 1){{ name }} kazandı! → tostring(name) .. " kazandı!"X:{{ x }} Y:{{ y }} → "X:" .. tostring(x) .. " Y:" .. tostring(y)Expressions are checked by the sandbox policy. Security-sensitive calls like loadstring, require, debug are automatically blocked.
Keep scan regions as small as possible — improves speed, reduces false matches.
Always add an exit condition when using infinite loops (BREAK, timeout, or conditional exit).
Use network operations and error-prone steps inside TRY_CATCH.
If you need global error handling, use the Error Handler (ERROR_HANDLER) block as a singleton in the project.
Small coordinate offsets (CLICK/SWIPE) improve tap accuracy across different DPI and screen scales.
Customize macros with Dialog block — different parameters each run.
Define repeating steps once with GROUP_CALL, call from many places.